How to set up a Mainnet Stake Pool on Apex Fusion
Follow this step-by-step guide to set up linux relay and block producer nodes. Using community guild operators tools and scripts.
It is recommended to have a block producer and 2 relay nodes, but 1 may suffice. The Stake Pool launch in this tutorial implies setting up 3 relay nodes and then converting 1 of those into a block producer node, setting up a wallet on the block producer node, creating and registering a pool from it.
1. Configure Linux Server: Add Non-root User
First, we need to ensure that apex fusion node is operating not under a root user. Thus, we need to create a new Linux user. So feel free to replace <non_root_username> with a desired username.
1.1 Add a new Linux user
useradd -m -s /bin/bash <non_root_username>1.2 Set up a password for the newly created user
passwd <non_root_username>1.3 Add proper root privileges for new user
usermod -aG sudo <non_root_username>1.4 Create a folder to store SSH keys
sudo mkdir -p /home/<non_root_username>/.ssh1.5 Copy the SSH keys from the root user to the new user
sudo cp /root/.ssh/authorized_keys /home/<non_root_username>/.ssh/authorized_keys1.6 Change the ownership of the folder to the new user
sudo chown -R <non_root_username>:<non_root_username> /home/<non_root_username>/.ssh1.7 Read, write, and execute permissions for the new user for .ssh folder
sudo chmod 700 /home/<non_root_username>/.ssh1.8 Read, write permissions for the new user for .ssh folder
sudo chmod 600 /home/<non_root_username>/.ssh/authorized_keys1.9 Restart the SSH service
sudo systemctl restart ssh2. Configure Linux Server: Disable root login
Now we can harden the Linux server by disabling root login.
2.1 Open the sshd_config file
sudo nano /etc/ssh/sshd_config2.2 Update these properties correspondingly
PubkeyAuthentication yes
PasswordAuthentication no
PermitRootLogin prohibit-password
PermitEmptyPasswords no2.3 Restart the SSH service
sudo systemctl restart ssh2.4 Disable root password login
sudo passwd -l root2.5 If for some valid reason you need to re-enable the account, simply use the -u option
sudo passwd -u root2.6
Logout and exit from your Linux machine and login again with <non_root_username> user! Otherwise, next steps will fail!
ssh <non_root_username>@<IP>3. Configure Linux Server: Install all the dependencies
Now we can install the cardano node and the guild operators scripts.
3.1 Install all the dependencies
sudo apt update -y && sudo apt upgrade -y && sudo apt autoremove && sudo apt autoclean -y3.2 Install tools for the cardano node
sudo apt-get install curl apt-transport-https ca-certificates gnupg-agent software-properties-common jq tmux magic-wormhole -y3.3 Use original Guild Deploy script for Cardano network instead of custom Apex Fusion ones.
curl -sS -o guild-deploy.sh https://raw.githubusercontent.com/cardano-community/guild-operators/master/scripts/cnode-helper-scripts/guild-deploy.sh && chmod 755 guild-deploy.sh3.4 Install the Default Cardano Node
./guild-deploy.sh -b node-8.9.4 -n mainnet -p /opt/apex -t cnode -s -pdlcowx && . $HOME/.bashrc3.5 Download Cardano Node 9.2.1 and we put it into the local folder so it overrides the 8.9.4 version installed by the guild deploy script.
cd .local && wget -c https://github.com/IntersectMBO/cardano-node/releases/download/9.2.1/cardano-node-9.2.1-linux.tar.gz -O - | tar -xzv3.6 This is a necessary step for cardano-cli to operate later like checking the latest block with `cardano-cli query tip --mainnet` instead of `cardano-cli query tip --mainnet --socket-path /opt/apex/cnode/sockets/node.socket`
echo "export CARDANO_NODE_SOCKET_PATH=\$(find /opt/apex/cnode/sockets -type s -name '*.socket')" >> $HOME/.bashrc && . $HOME/.bashrc3.7 Check that Cardano Node and CLI are installed correctly, these exact versions should be shown in the output.
cardano-cli version && cardano-node version# cardano-cli 9.4.1.0 - linux-x86_64 - ghc-9.6 # git rev 0000000000000000000000000000000000000000 # cardano-node 9.2.1 - linux-x86_64 - ghc-8.10 # git rev 5d3da8ac771ee5ed424d6c78473c11deabb7a1f3
4. Set Up CNTools for Apex Fusion
Now we need to install a custom script for Apex Fusion network, it will make sure that guild deploy script run properly, set necessary environment variables and download Apex Fusion config and genesis files, convert those to configuration.json and later update scripts/env to have correct CNODE_PORT and CONFIG env variables.
4.1 Install the Cardano Node
curl -o $CNODE_HOME/scripts/ApexPrimeMainnet-to-cntools.sh https://raw.githubusercontent.com/CryptoBlocks-pro/public/refs/heads/main/ApexFusion/ApexPrimeMainnet-to-cntools.sh && cd $CNODE_HOME/scripts && chmod 755 ApexPrimeMainnet-to-cntools.sh && ./ApexPrimeMainnet-to-cntools.shLocate in $CNODE_HOME/scripts/env CNODE_PORT=5521 CONFIG="/opt/apex/cnode/files/configuration.json"
5. Configure Topology for Relay Nodes
This is the topology.json file for the realy node, make sure to put correct IPs or domain names in it.
5.1 Install the Cardano Node
cd $CNODE_HOME/files && echo '{
  "bootstrapPeers": [
    { "address": "bootstrap.prime.mainnet.apexfusion.org", "port": 5521 }
  ],
  "localRoots": [
     {
      "accessPoints": [
        {
          "address": "<BLOCK_PRODUCER_IP>",
          "port": <BLOCK_PRODUCER_PORT>
        }
      ],
      "advertise": false,
      "valency": 1,
      "trustable": true
    }
  ],
  "publicRoots" : [
    { "accessPoints": [
        { "address": "relay-g1.prime.mainnet.apexfusion.org", "port": 5521 },
        { "address": "relay-g2.prime.mainnet.apexfusion.org", "port": 5521 }
      ],
      "advertise": true,
      "valency": 1
    }
  ],
  "useLedgerAfterSlot": 0
}
' > topology.json
"accessPoints" should point to your block producer node, and only it, the local connections to block producer should be exposed only to your relay nodes. It should not be set in "publicRoots".
6. Launching the Node
After everything was configured, the node should seamlessly boot up, though cnode-submit-api might not start, it's not important now.
6.1 Execute Cardano Node and Cardano Node Submit API scripts as daemons.
cd $CNODE_HOME/scripts && ./cnode.sh -d && ./submitapi.sh -d6.2 Start Cardano Node and Cardano Node Submit API
sudo systemctl start cnode.service && sudo systemctl start cnode-submit-api.service6.3 Checl the status of Cardano Node and Cardano Node Submit API, the status of node should change from starting to active (running).
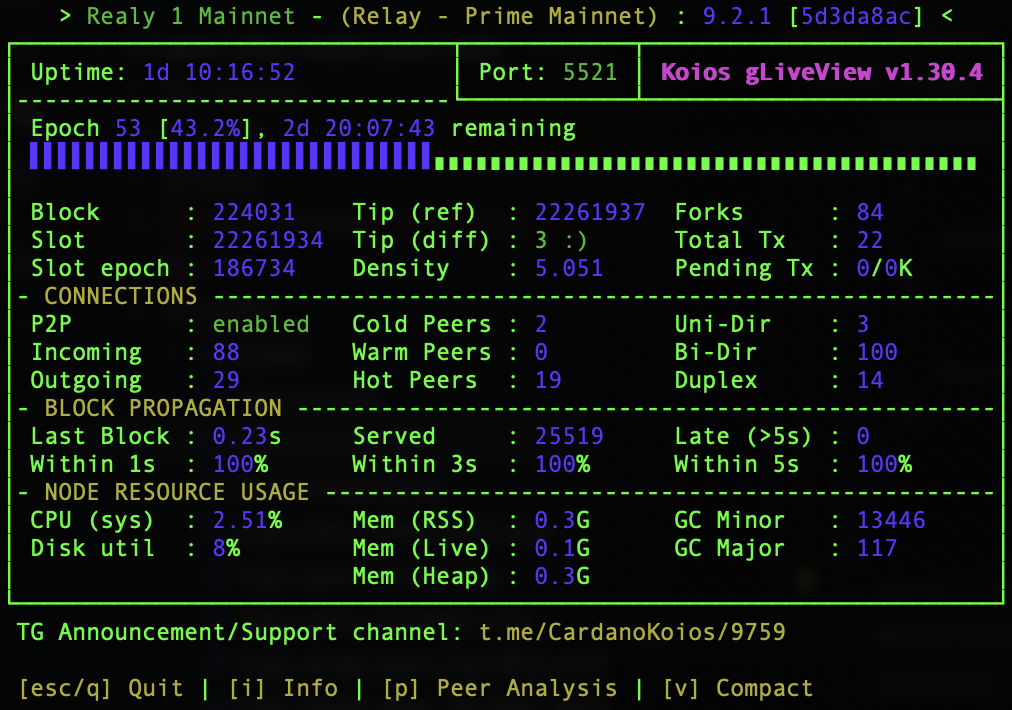
sudo systemctl status cnode.service && sudo systemctl status cnode-submit-api.service6.4 Use the gLiveView script to monitor state of the node. More details about each field can be found in here https://cardano-community.github.io/guild-operators/Scripts/gliveview/
cd $CNODE_HOME/scripts && ./gLiveView.shMake sure that P2P is enabled, there are incoming and outgoing connections and on the top it says Relay - Prime Mainnet
7. Convert a Relay Node into a Block Producer
Now we can convert one of the Relay Nodes into the Block Producer Core Node.
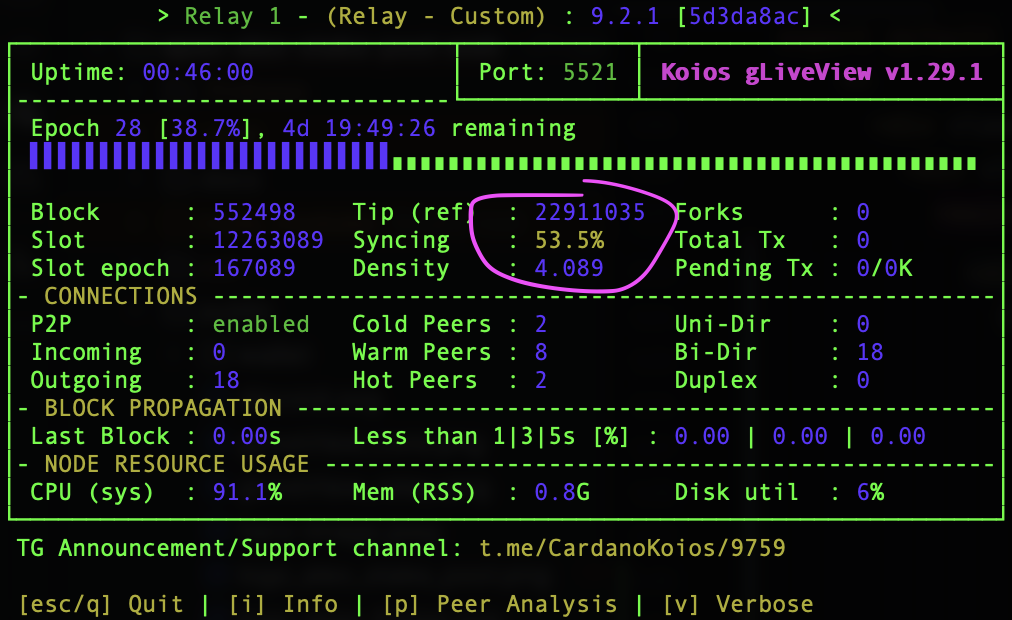
It is crucial to wait until all relay nodes finish syncing with the chain and then and only then we can start to convert one of the relay nodes to the block producer one!
7.1 First stop the Cardano Node process.
sudo systemctl stop cnode.service7.2 Now update the topology.json file to the block producer one.
cd $CNODE_HOME/files && echo '{
  "bootstrapPeers": [
    { "address": "bootstrap.prime.mainnet.apexfusion.org", "port": 5521 }
  ],
  "localRoots": [
     {
      "accessPoints": [
        {
          "address": "<RELAY_NODE_1_IP>",
          "port": <RELAY_NODE_1_PORT>
        },
        {
          "address": "<RELAY_NODE_2_IP>",
          "port": <RELAY_NODE_2_PORT>
        }
      ],
      "advertise": false,
      "valency": 2,
      "trustable": true
    }
  ],
  "publicRoots" : [
    {
      "accessPoints": [],
      "advertise": false
    }
   ],
  "useLedgerAfterSlot": -1
}' > topology.json
The block producer node should connect only to its relay nodes in the "localRoots" field. It should not connect to those in the "publicRoots" field. It is important to have "advertise: false" in the "publicRoots" and "useLedgerAfterSlot: -1", since BPs should only show in and out connections to your own relays. 0 will allow your BP to use the Ledger to find other peers. -1 will tell it not to look for other peers.
7.3 Start the Cardano Node process to grap the changes.
sudo systemctl start cnode.service8. Set Up a Wallet and Register the Pool
Now on the block producer node we need to create a wallet and a pool correspondingly. The following actions will create private and other keys for wallet and a pool, then the pool should be registered online and wallets as well.
8.1 Launch the CNTools script
cd $CNODE_HOME/scripts && ./cntools.sh -a8.2 Select the client tool wallet type, so files are created locally.
Wallet type (c)CLI8.3 Following this link create a metadata file for the pool, it will be hosted on developer portal, sure you can host it anywhere you like.
Build metadata to get URL for pool's metadata https://developers.apexfusion.org/spo8.4 Now once the wallet and metadata were created we can go ahead and create a pool.
Go to Pool, New.
Name it a unique 4-5 digit Ticker name8.5 Register the pool online
Now choose registerPledge amount should be not greater than your wallet's balance.
8.6 Follow the steps and set your margin and cost.
8.7 Paste your metadata link
8.8 Pool registration - [i] IPv4/v6 address
8.9 Enter your RELAY IP and Port - One at a time
8.10 Choose your wallet - Multi Pool NO - Separate reward wallet YES / NO. We can have separate wallets for rewards and pledge, but both would need to be registered online then. Also for rewards to be considered as pledge.
8.11 Your Pool will now register on the Chain when transaction completes.
8.12 Get some amount to put to the pool address to register online.
8.13 Get some amount to put to the wallet address to register online.
9. Update Pool Configuration for Block Production
After the proper pool name aka ticker is set in the scripts/env then node will start operate as a block producer
9.1 Then update ENV we set POOL_NAME to equal pool folder name
sed -i "s|^#\?POOL_NAME=\".*\"|POOL_NAME=\"$(basename $(find $CNODE_HOME/priv/pool -mindepth 1 -maxdepth 1 -type d ! -name '.' ! -name '..' | head -n 1))\"|" "$CNODE_HOME/scripts/env"9.2 Restart the node so it can sync and start operating as a block producer.
If node is in constantly starting state and not reaching the active state
rm -rf $CNODE_HOME/dbsudo systemctl restart cnode.service9.3 Verify with gLiveView that node is running as a block producer
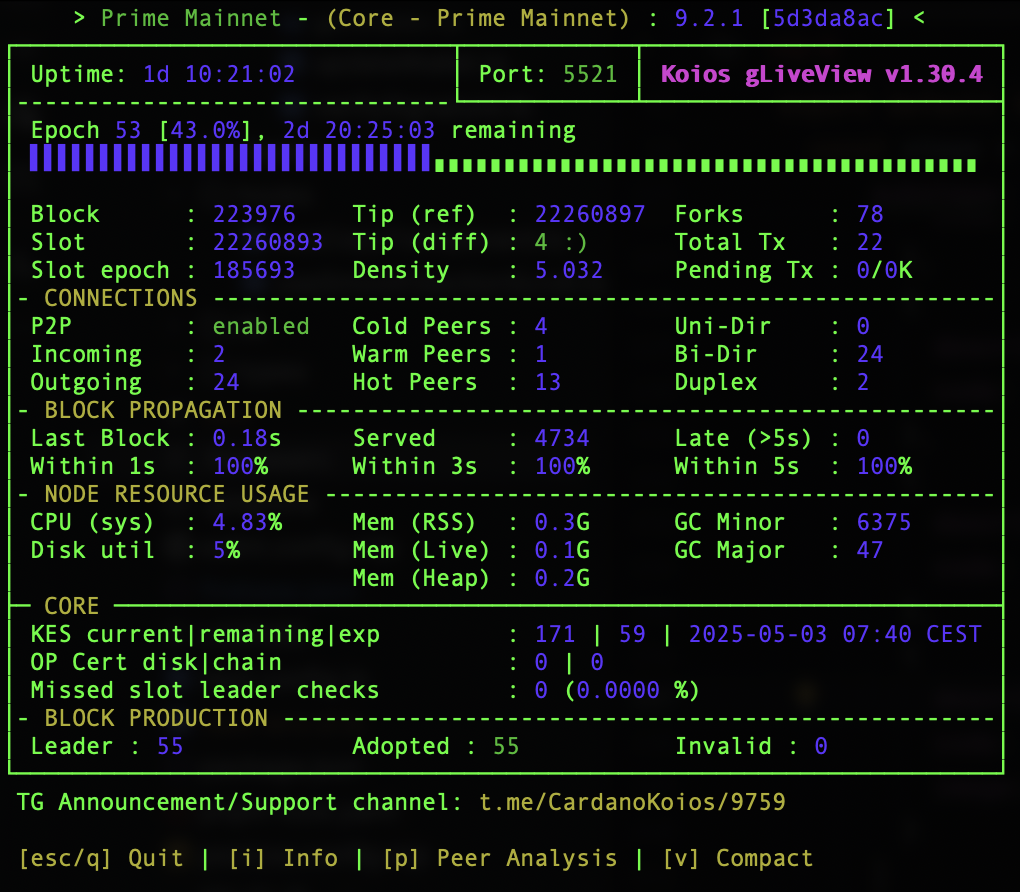
cd $CNODE_HOME/scripts && ./gLiveView.shMake sure that P2P is enabled, there are incoming and outgoing connections and on the top it says Core - Prime Mainnet
9.4 To double-check that node is actually behaving as a block producer it should use pool's keys and apply the operational certificate, it can be checked via console.
ps aux | grep cardano-nodeOutput should give appx these lines: <non_root_username> 1207386 1.7 3.7 1073805020 299644 ? Ssl Feb03 37:16 /home/<non_root_username>/.local/bin/cardano-node +RTS -N4 -RTS run --topology /opt/apex/cnode/files/topology.json --config /opt/apex/cnode/files/configuration.json --database-path /opt/apex/cnode/db --socket-path /opt/apex/cnode/sockets/node.socket --shelley-kes-key /opt/apex/cnode/priv/pool/<POOL_NAME>/hot.skey --shelley-vrf-key /opt/apex/cnode/priv/pool/<POOL_NAME>/vrf.skey --shelley-operational-certificate /opt/apex/cnode/priv/pool/<POOL_NAME>/op.cert --port 5521 --host-addr 0.0.0.0 <non_root_username> 1387961 0.0 0.0 7080 2048 pts/0 S+ 22:39 0:00 grep --color=auto cardano-node